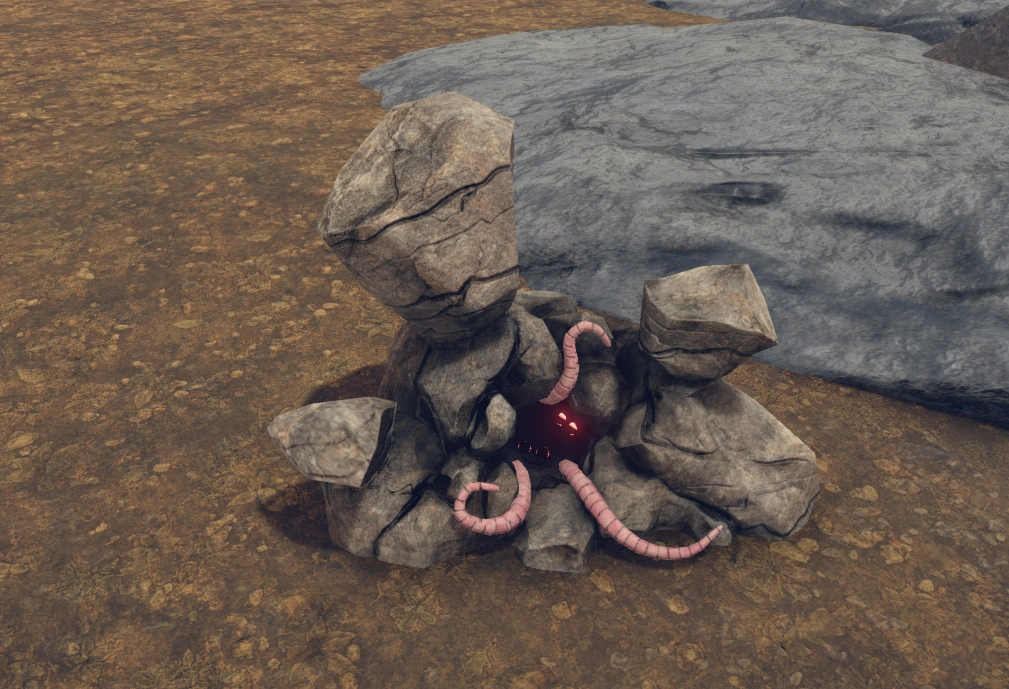
An Unidentified Molepig Den, one of the possible sample nodes.
Unidentified Samples are a unique Gathering mechanic in ![]() The Three Brothers DLC, in the Caldera region.
The Three Brothers DLC, in the Caldera region.
Overview[ | ]
There are three types of Unidentified Sample nodes you can find in the Caldera region:
- Unidentified Molepig den (produces Molepig Specimen, requires Fishing Harpoon)
- Unidentified Ore Vein (produces Ore Sample, requires Mining Pick)
- Unidentified Roots (produces Plant Sample, requires Mining Pick)
There are many potential locations where these nodes spawn, and there are four random rotations which determine which nodes will be active at any one time.
The random rotation changes every two in-game days, however the samples themselves are subject to Area Reset and still require 7 days spent outside of the scene to replenish their resource. A quick way to reset scenes is by speaking to Josef Dumas and offering to help build for a week.
In addition to the random rotations, all nodes have 10 random positions (for exterior nodes) or 5 random positions (for dungeon nodes) where they may spawn. This means that realistically you will have a rough idea at best of where you should expect to find them, but over time you will become familiar with common places to look.
Identifying[ | ]
Samples can be identified by Evangeline Vallier in New Sirocco after the Sirocco quest line has begun.
You have an equal chance of receiving any of the available 6 outcomes from each sample.
Expeditions[ | ]
(Definitive addition only) After your first 3 samples handed into Evangeline, and then every 10 samples after that, players can ask her to send out workers on an expedition to hunt for a specific rare material. It takes 24 in-game hours for the expedition to complete, after which the player will receive the material for free, and can then send out another expedition if they wish (after another 10 samples have been handed in).
Rotations[ | ]
There are four random rotations which determine where the nodes will spawn, and the rotation will change every 2 days - though it is possible to get the same rotation twice in a row.
The maps for the exterior regions show the potential spawns for each rotation, but keep in mind only one of each ID (the number) for each node can be active at a time.
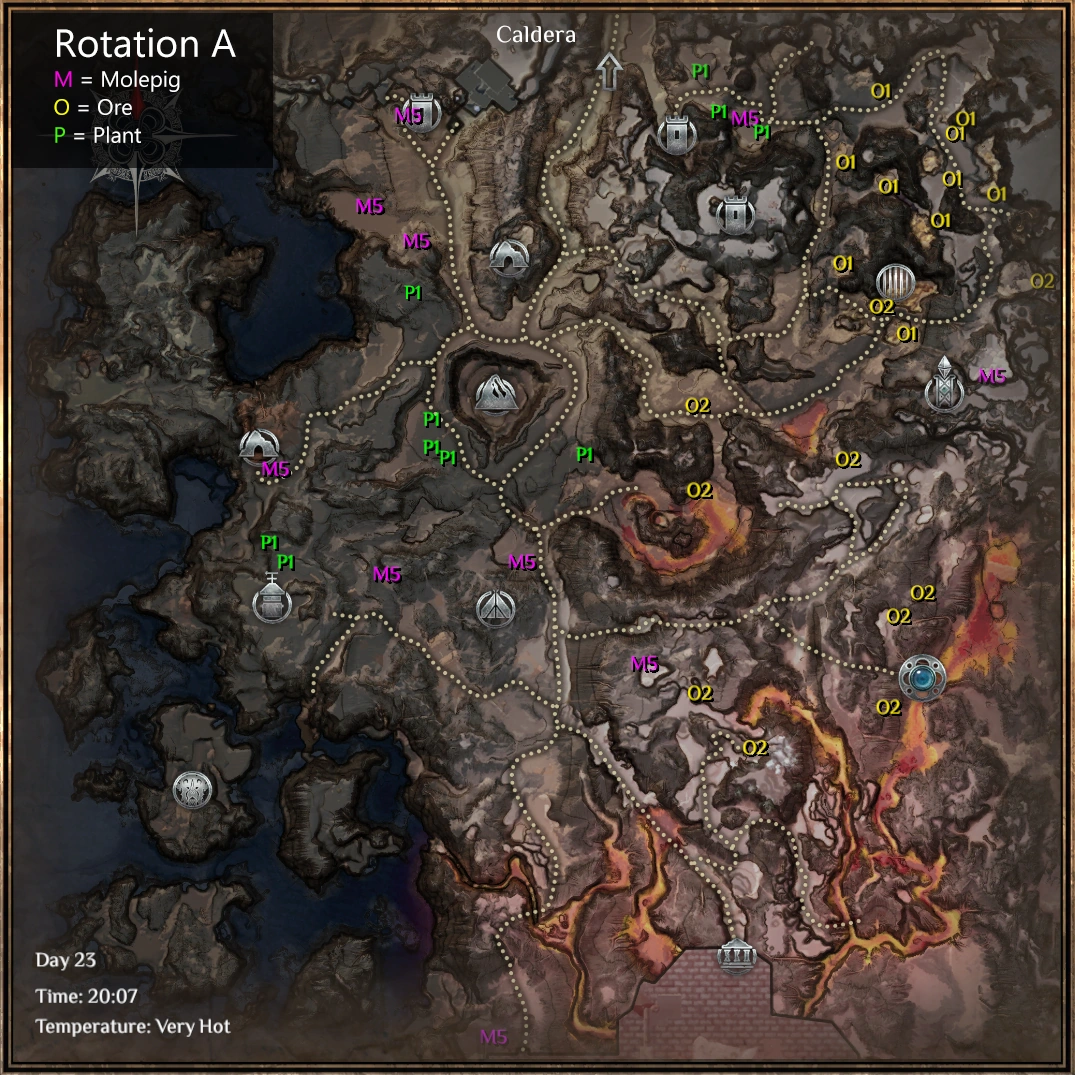
Rotation A[ | ]

Exterior Caldera:
- Ore #1 and #2
- Plant #1
- Molepig Den #1 and #5
Molepig Den:
- 1x Steam Bath Tunnels
- 1x The Grotto of Chalcedony
- 1x Oil Refinery
- 1x The Vault of Stone
- 1x Old Sirocco
Ore:
- 1x Sulphuric Caverns
- 1x Scarlet Sanctuary
- 1x Myrmitaur's Haven
- 1x Oil Refinery
- 1x The Vault of Stone
- 1x Old Sirocco
- 1x Ark of the Exiled
Plant:
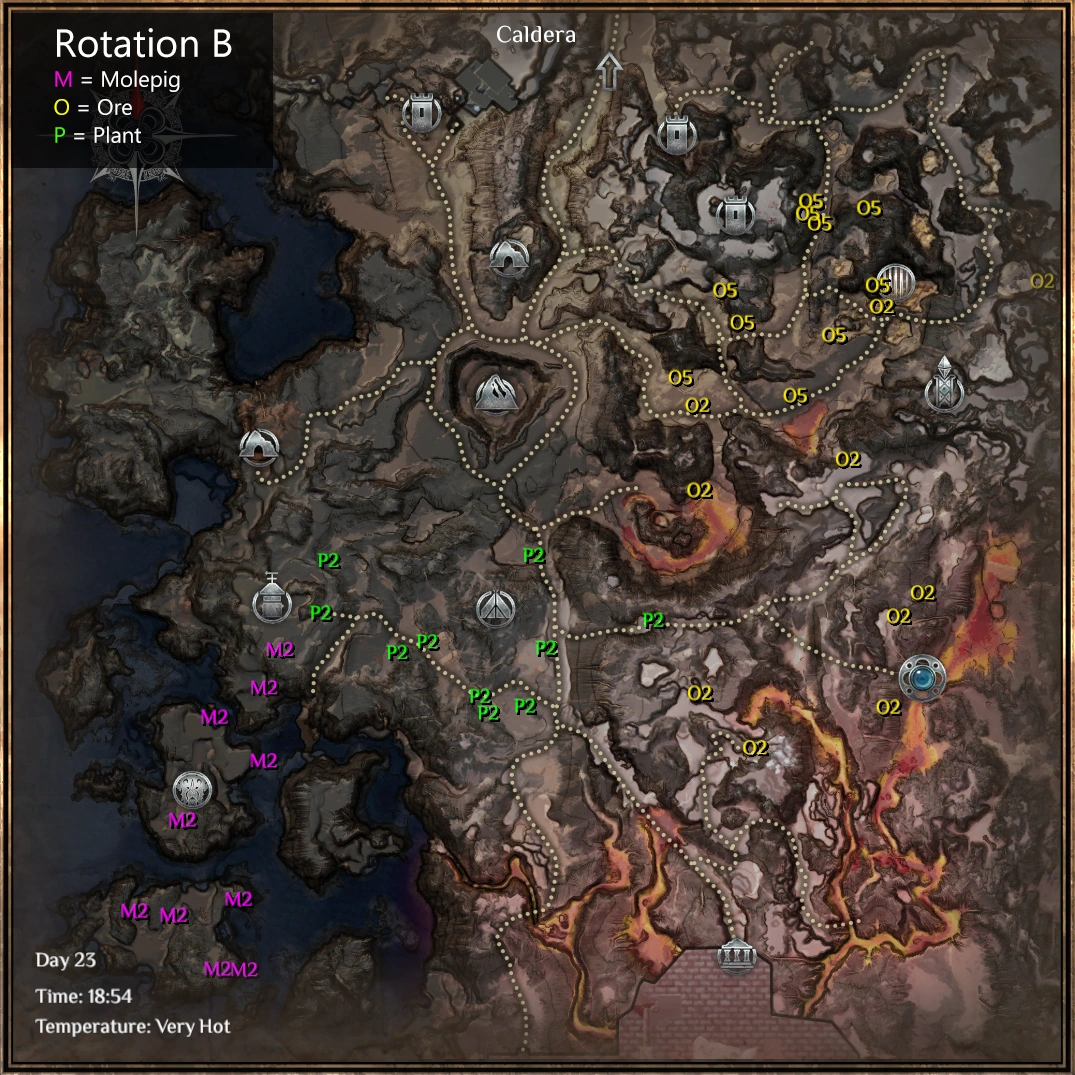
Rotation B[ | ]
Exterior Caldera:
- Ore #2 and #5
- Plant #2
- Molepig Den #2
Molepig Den:
- 1x Steam Bath Tunnels
- 1x Sulphuric Caverns
- 1x The Grotto of Chalcedony
- 1x Myrmitaur's Haven
- 1x Ark of the Exiled
Ore:
- 2x The Grotto of Chalcedony
- 1x Steam Bath Tunnels
- 1x The Eldest Brother
- 1x The Vault of Stone
- 1x Ark of the Exiled
Plant:
- 1x The Eldest Brother
- 1x Scarlet Sanctuary
- 1x Oil Refinery
- 1x The Vault of Stone
- 1x Old Sirocco
Rotation C[ | ]
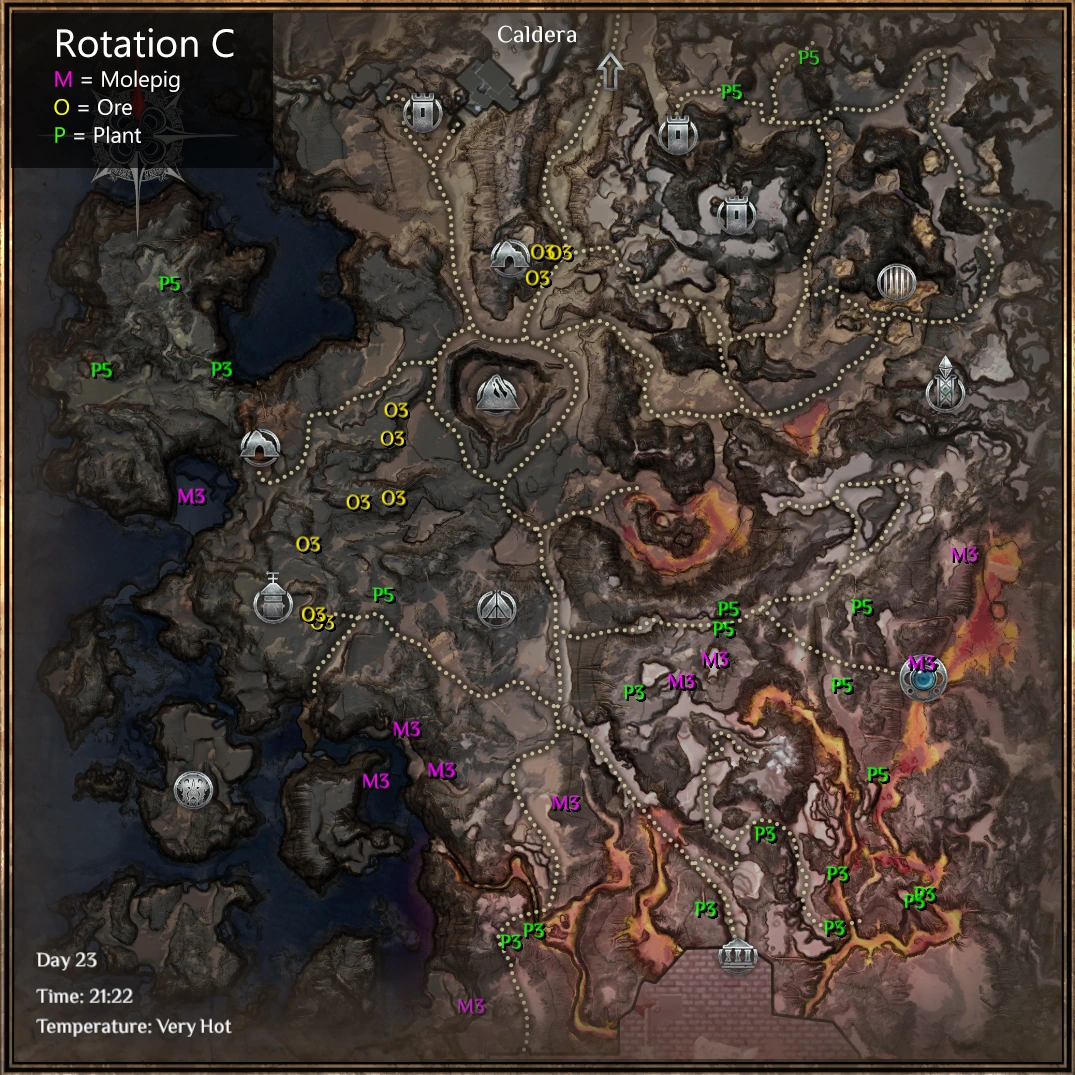
Exterior Caldera:
- Ore #3
- Plant #3 and #5
- Molepig Den #3
Molepig Den:
- 1x Sulphuric Caverns
- 1x The Eldest Brother
- 1x Scarlet Sanctuary
- 1x Myrmitaur's Haven
- 1x Oil Refinery
- 1x Old Sirocco
- 1x Ark of the Exiled
Ore:
Plant:
Rotation D[ | ]
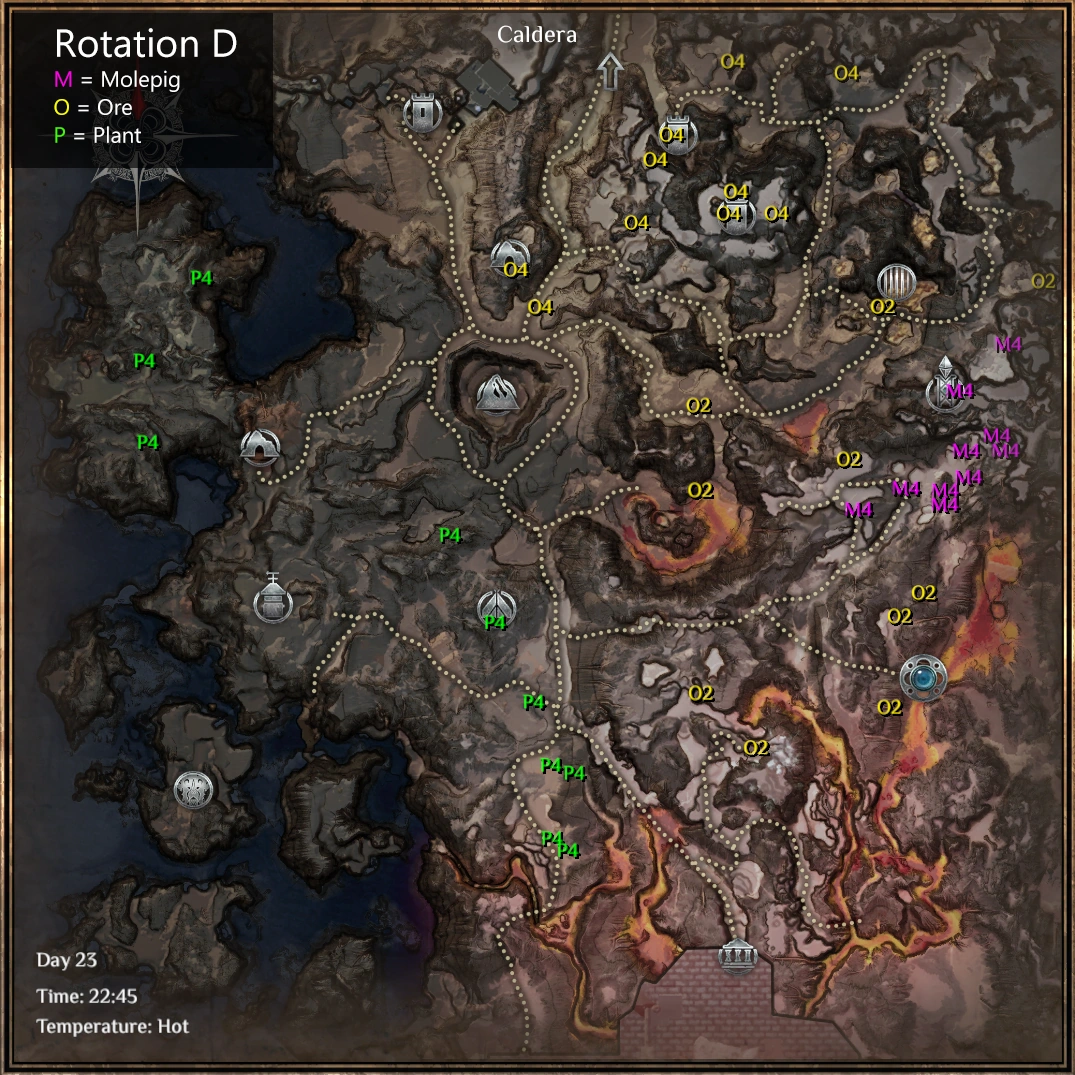

Exterior Caldera:
- Ore #2 and #4
- Plant #4
- Molepig Den #4
Molepig Den:
Ore:
- 1x Steam Bath Tunnels
- 1x The Eldest Brother
- 1x Myrmitaur's Haven
- 1x Oil Refinery
- 1x Old Sirocco
Plant:
- 1x Steam Bath Tunnels
- 1x Sulphuric Caverns
- 1x The Grotto of Chalcedony
- 1x Myrmitaur's Haven
- 1x Oil Refinery
- 1x Old Sirocco
- 1x Ark of the Exiled
Random Node[ | ]
There is 1 of each sample which has a random spawn position in the Caldera Misc. Dungeons, and this is independent of which rotation you are on. It will pick a random spawn position once every few days.
Ore:
- Oily Cavern, in the small room south-west from the entrance
- The River of Red, half way through near a junk pile
- Immaculate's Refuge, to your right as you enter the sulphur cloud below
- The Tower of Regrets, in the room north of the Blue Skull altar, under the eastern stairs next to the Palladium Ore vein
- New Sirocco Mines, near the stone blocks at the center of the red room deep in the mines
Molepig Den:
- Immaculate's Refuge, on the eastern wall of the refuge
- Oily Cavern, near the oily river, up the small hill to the east
- Calygrey Colosseum, east of the Master of the Colosseum there is a corridor which goes north, at the end there
- The Tower of Regrets, in the room south of the Blue Skull altar, up on the raised platform on the east wall
- New Sirocco Mines, on the south side of the lava river near the wooden tower
Plant:
- Oily Cavern, near the oil river, south of an Oil Node next to a junk pile
- The River of Red, half way through near a junk pile
- Immaculate's Refuge, behind the tent with a chest in it
- The Tower of Regrets, near the blue skull altar
- New Sirocco Mines, north of the entrance near the Oil Node